IDM PowerTips
Creating user and project tools
UltraEdit-32/UEStudio allows you to configure DOS or Windows commands to make your tasks easier. You can configure up to 50 tools, 25 project tools and 25 standard tools. You can add your tools to the menus/toolbars and even map keyboard shortcuts to your tools.
Creating a Tool
To open the tool configuration dialog go to the Advanced Menu and click on the Tool Configuration option. If you want to configure a project specific tool, click on the Project Tool Configuration option.
Note: In order to use project specific tools, you must have a project open. You can create a project in the Project menu.
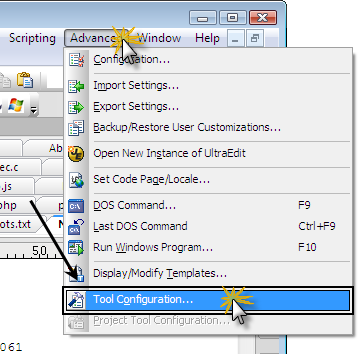
Step 1: Configure the Tool Commands
After you’ve clicked on the tool configuration option, you will see the Tool Configuration dialog:
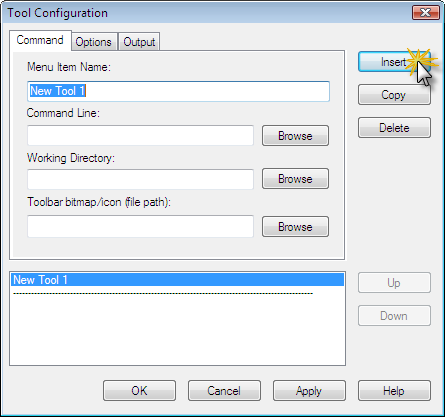
Any changes to your tools in this dialog can be saved by pressing the OK or Apply buttons.
For our example, we will configure a tool to list the contents of our working directory, using the DOS “dir” command. We’ll begin by configuring the “Command” tab of the Tool Configuration Panel.
Menu Item Name
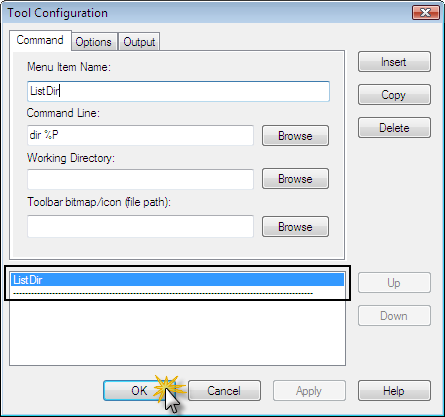
It is best to name your tool with a short, descriptive title so you can easily identify it later. We will call this tool “ListDir.”
Command Line
This is the command line that will be invoked when the tool is run.
The command line accepts and understands a handful of variables. We suggest you familiarize yourself with the available variables because the variables can help you to create powerful tools. We will not cover all the variables in this Powertip, but for your information some of the more commonly used variables are as follows:
- %P Path only (“C:\project\test\”)
- %N fileName only (“test”)
- %E Extension only (“.c”)
- %F Fully Qualified path and file name (“C:\project\test\test.c”)
%P%N%E is equal to %F which is (“C:\project\test\test.c”) in the example above.
For our tool, we want to list the active directory’s contents, so we will use the command “dir %P”. When executed, the tool will list the contents of the current file path (%P).
Working Directory
This is the working directory for the specified command. If it is applicable, the process will be started using this as its working directory.
Our example does not require a working directory so we will leave this field blank.
Toolbar/Bitmap Icon
You can use this to specify a bitmap or icon to be used on the toolbar for the tool.
Tool List Pane
All of your defined tools will be listed in the Tool List pane. You may rearrange the tools by selecting them and using the Up and Down buttons to move the selected tool in the list.
Step 2: Configure the Tool Options
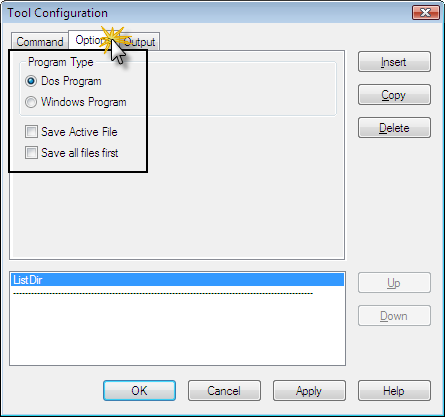
The “Options” tab in the Tool Configuration dialog is used to define options for the currently selected tool.
Program Type
Here you will need to define which type of program the tool will invoke upon use. Since we are using DOS commands, we will set this to “DOS.”.
Save Active File
If this option is checked, the active file will be saved before the tool is run; otherwise it will not save the file. The exception to this is if Save all files first is checked.
Save All Files First
If this option is checked, all open files will be saved before the tool is run.
Step 3: Configure the Tool Output
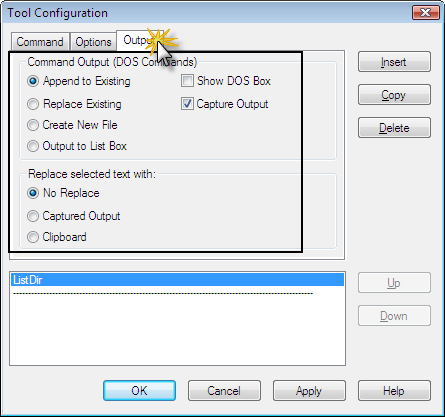
Define your Output options in the “Output” tab.
Command Output (DOS Commands ONLY)
DOS command output may be optionally captured to a file. The four options for DOS command output are:
- Append to Existing (create new file if one does not exist)
- Replace Existing
- Create New File
- Output to List Box (Output Window)
Show DOS Box
If this option is checked, a DOS window will be shown as the command is being executed, otherwise the DOS window will be hidden.
Capture Output
If this option is not selected then neither the output of the tool or any associated error output will be captured.
Replace Selected Text With
If you enable (check) this option, the captured output or contents of the clipboard will be used to replace the current selection (or inserted at the cursor position if no selection). If no replace is selected, the output will be displayed as normal.
Step 4: Adding the Tool to the Main Toolbar
After you’ve created a tool, you can easily add it to the toolbars in the advanced configuration.
Customize the Toolbar
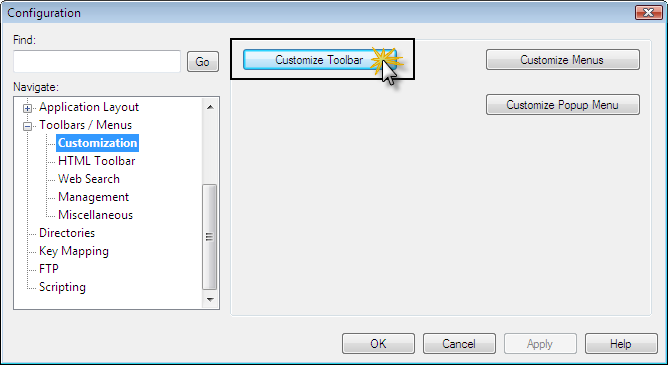
You can access the Toolbar Customization panel in the Advanced menu item Configuration : Toolbars / Menus : Customization. Click “Customize Toolbar” to add your tool to the main menu.
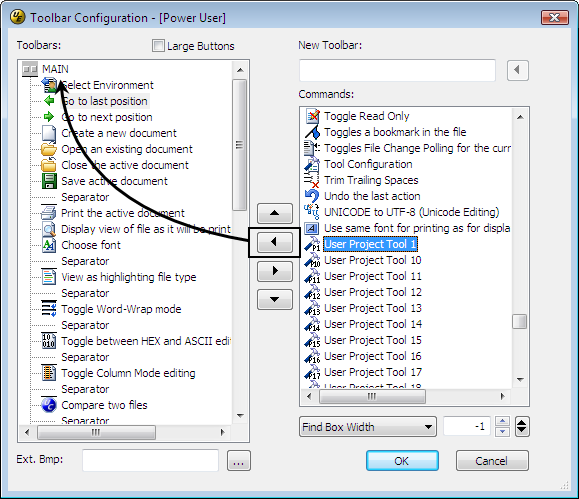
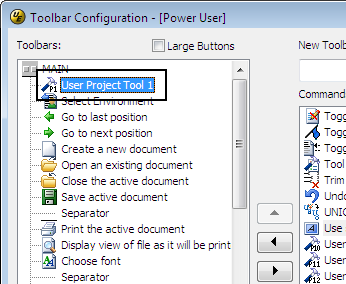
Inside the Toolbar Configuration panel, scroll down in the “Commands:” list to the tool you’ve configured. In our example, “User Tool 1.”
You can tell which tool number you’ve configured by looking at the tool’s icon in the Advanced menu. Select the tool and press the Left arrow button to add the tool to your Main Toolbar. You can then use the Up and Down arrows to adjust the position of the tool in the toolbar.
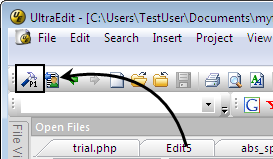
Click “OK” and you will see the tool exactly where you positioned it on the Toolbar. When clicked, your tool will execute.
Step 5: Assign a Hotkey for your Tool
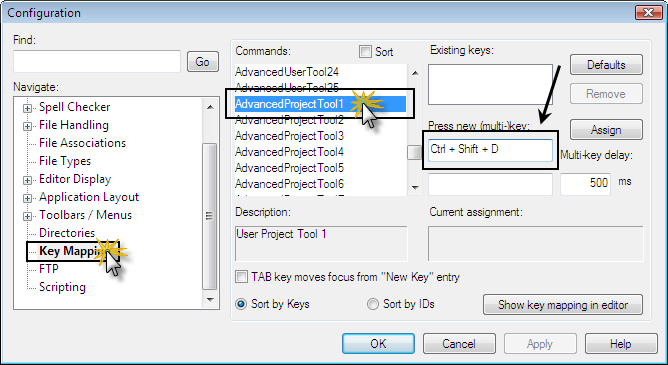
UltraEdit-32/UEStudio also allows you to assign hotkeys for your tools. You can do this in the Key Mapping dialog in Advanced : Configuration.
Select your tool from the “Commands” list (it will be in the “Advanced” Command group since it is located in the Advanced menu), then simply click on the “Press New (Multi-)Key” text field to key in your tool’s hotkey.
We assigned our “ListDir” tool as Ctrl + Shift + D.
