Find and replace, find in files, and replace in files
UltraEdit and UEStudio have powerful find and replace functionality for searching and replacing text in one or more text files. There are several settings and options that allow you to target your search to specific file types, project files, directories of files, and more. Using these available tools, you can customize your find or replace to quickly make changes to text or code in a directory of files, or to locate a unique string within a single file buried in hundreds of other files, and even find files that don’t contain a specific string.
Since find and replace is a staple of any editor, you can find these options in the “Home” tab of the ribbon, in the “Search” group.

Find
You can search in the active file with the “Find” option. Once you select this option, the Find dialog will open. Here you can enter our search string and also specify other search options. To quickly search, type in what you are looking for and press Next. (Note: You can also press Ctrl + F to open “Quick Find”, which allows you to quickly search for a string in a smaller fly-out box, much like the search feature in web browsers.)
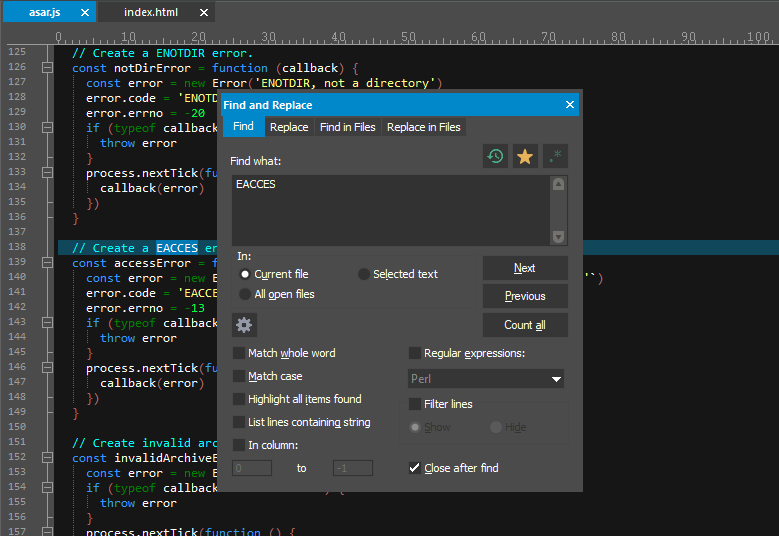
The first found string will be highlighted in the file. (If you don’t want the find dialog to close after clicking Next, open it again by pressing Ctrl + F, F, then click the gear icon and uncheck “Close after find.”) You can then step through all occurrences of the string in the file by pressing F3, which will take you to the next instance found. Press Ctrl + F3 to jump to the previous instance.
Count all
This button will count the number of occurrences of your search string in the active file. The count is shown next to the gear icon right there in the Find dialog.

In:
- Current file – If you select this option, UltraEdit/UEStudio will restrict the search to the active file.
- Selected text – If you select this option, UltraEdit/UEStudio will only search in the active selection text.
- All open files – If you select this option, repeating the find next command (either via the Next button or F3) will continue to cycle through all other open files after finishing the search through the active file.
Click the gear icon to reveal several options and settings for the search. We’ll go over these below.
Match whole word
UltraEdit will not restrict a search to matching whole words only. This option restricts the search to whole words only; for example, words that are surrounded by a space character. As an example, you might use this option to search for the letter “a” or “A” by itself without matching words that include “a”.
What defines a whole word? A whole word is a series of one or more alphanumeric (a-z and 0-9) or underscore (_) characters. Any other character is not considered a “word” character. You should only use this option if the string you’re searching for consists of nothing but word characters.
Match case
By default your search will not be case sensitive. Selecting this option will cause UltraEdit to only return results that are exact case matches of your search string.
Regular expressions
A regular expression search allows you to search for strings that are different, but still match of a specific pattern. For instance, a search string of “<.*>” with Perl regular expressions enabled will match all strings that begins with “<” and end with “>”, with any number of any non-newline characters between them.
The “.” in our search string tells UltraEdit to find any character that is not a new line, and the “*” character qualifies that by telling UltraEdit to search for this and match it 0 or more times. Therefore, all of the following strings would be matched:
<><a href="#top><img src="/images/powertips/ue/search4.png" alt="UltraEdit search">
However, the following string would not be matched since it contains a line break (new line). While the “.” character will match any character, it will not match a line break.
<!DOCTYPE html PUBLIC "-//W3C//DTD XHTML 1.0 Strict//EN"

"http://www.w3.org/TR/xhtml1/DTD/strict.dtd">
You can learn more about Perl regular expressions (that’s the type of regular expression we recommend our users use) at any of the following power tips:
- Perl regular expressions: Getting started
- Perl regular expressions: Non-greedy regex
- Perl regular expressions: Digging deeper
- Perl regular expressions: Backreferences
You can also review the Perl regular expression documentation on our wiki.
Highlight all items found
This option will result in all items matching the search string to be highlighted as soon as you press the Next button. (Note: You can also achieve this effect by using Shift + double click to select a word, or by pressing Ctrl + period to highlight all instances of the word under the caret.)
List lines containing string
If this option is selected, as soon as you press Next, the Find String List will open with a list of all lines in the active file that contain your search string. You can double-click a result in this list to jump to its location in the active file.
In column
This option allows you to restrict the search to a specific range of columns within each row. For more information on this feature, read over the Column based find and replace power tip.
Filter lines
If you check this option, then the “Show” and “Hide” buttons will become enabled. If you select “Show” then click Next, all lines not containing the “Find what” string will be hidden, and only lines containing a match will be visible. Conversely, if you select “Hide” , only lines containing a match of the “Find what” string will be shown, and all other lines will be hidden.
Recent search history
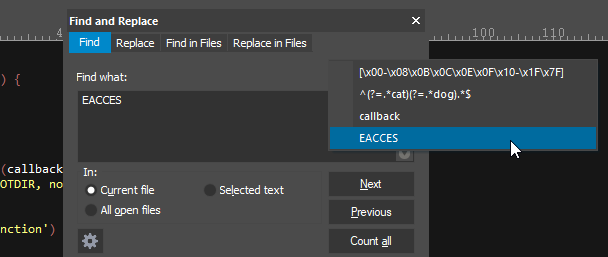
You can cycle through your recent search history by selecting all text in the “Find what” field and then pressing Up / Down arrow on your keyboard.. Additionally, you can click the history button just above the “Find what” field to view and select an item from your search history.
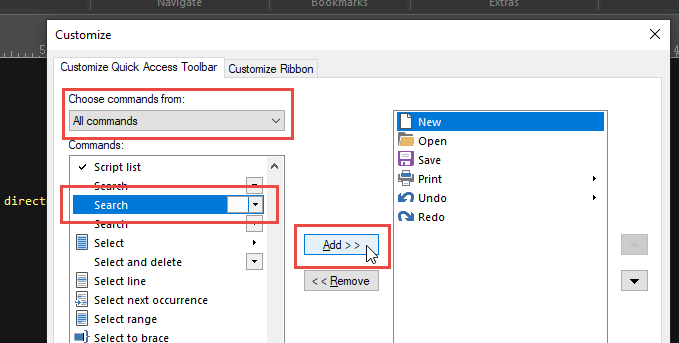
There is also a useful item available to you if you wish to access your search history without opening the Find dialog. You can add the search history drop down to your ribbon, toolbar, or Quick Access Toolbar to be able to scroll through your search history, select an item, then press F3 to search for it. To add this, right-click on your ribbon, toolbar, or Quick Access Toolbar and select the Customize option. In the “Choose commands from” list, select “All commands.” Locate the “Search string” with the drop down box next to it and click the Add» button to add it.
Search favorites
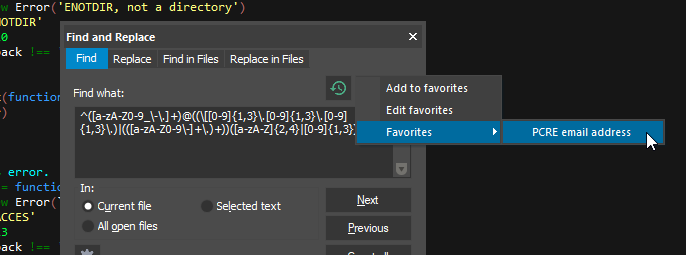
The star button in the find and replace dialog allows you to access your favorite search strings. This can be especially useful for complex regular expression patterns. To use an item stored in the search favorites list, simply click the star button and navigate to Favorites, then select the item. In the screenshot below, we’re accessing a named search favorite, so the name (not the search string itself) is what appears in the list.
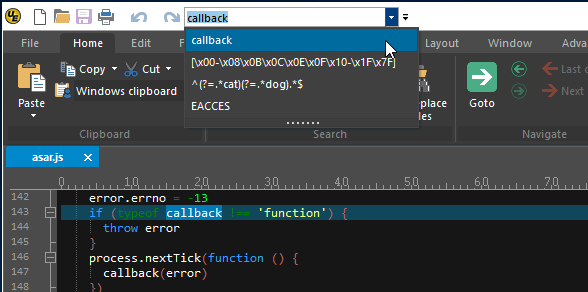
With the search history drop down you can select the search text you need and press Enter to search for it, then press F3 to find next occurrences, all without ever opening the find dialog. You can also type in a new string to search for and press Enter to invoke a search.
You can learn more about search favorites in our search favorites power tip.
Replace
The Replace option in the “Home” tab of the ribbon will open the replace dialog. You can also press Ctrl + R to open replace.
You’ve probably noticed that find, replace, find in files, and replace in files all share the same window, and that you can click the tabs to switch between these search modes. This is helpful, as oftentimes you might be doing a find for a string and then decide you want to replace that string in the file with something else. You can click the “Replace” tab, and your find string will carry over to the “Find what” field for replace.
There are several options for configuring your search in the replace dialog. For our purposes, we will do a simple search and replace, replacing all occurrences of “colour” with “color” as shown below.
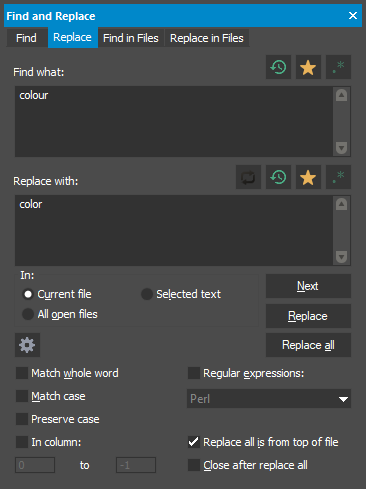
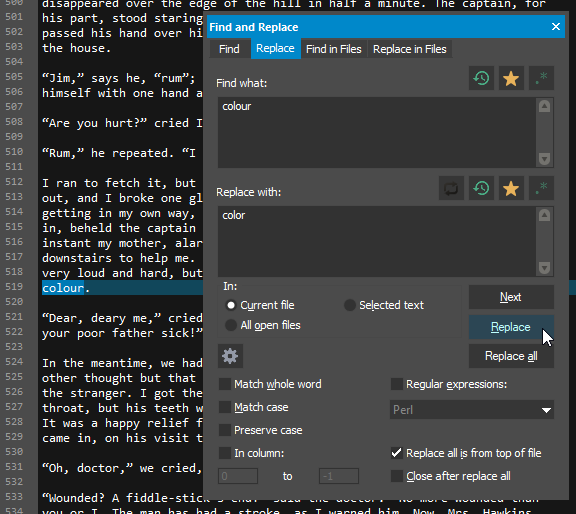
Click Replace all to replace all instances of your string immediately. In this case, however, we want to see each of our matches before we replace them. To do this, we’ll click the Next button instead. This will jump to and select the first occurrence of the find string. We can then click Replace to replace this occurrence. UltraEdit then automatically jumps to the next occurrence.
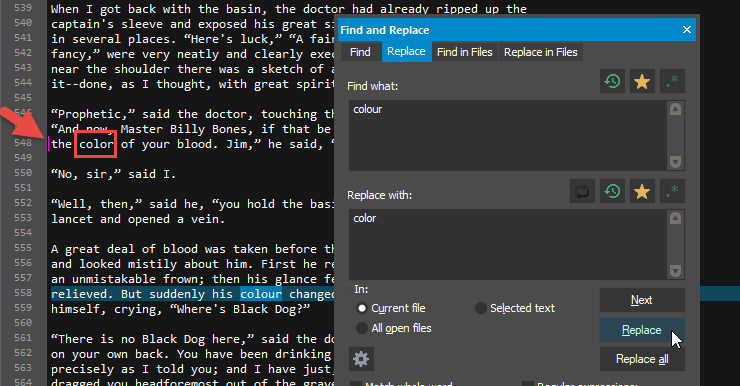
You’ll notice the line change indicator display next to the line number where a replace happened. The line change indicator helps you visually inspect where there have been changes (save and unsaved) in the file. It’s very helpful especially when doing a Replace all so you can see the lines where a replacement was made.
There are some additional settings unique to replace which we’ll go over next. You can see these by clicking the gear button. The options for “In:”, “Match whole word”, “Match case”, “Regular expressions”, and “In column” work the same as in the find dialog as described above, and so we won’t repeat this information.
Preserve Case
The option to preserve case will match the case of the replace string with the case of the found string. The rules for this are as follows:
- If the word found is all lowercase the replacement word will be all lowercase
- If the word found is all UPPERCASE the replacement word will be all UPPERCASE
- If the word found is MixedCase the replacement word will MATCH the casing of the replacement word.
For example, if this option is selected and you search for “The” and replace it with “Then,” the following replaces would occur:
- “the” will be replaced with “then”
- “THE” will be replaced with “THEN”
- “The” will be replaced with “Then”
Replace all is from top of file
If this is checked, the replace will start at the top of the active file rather than the current caret position. This setting is important because without it, a “Replace all” could potentially skip an occurrence that is above the active file.
Close after replace all
If this option is selected the dialog will close after the command has been executed.
Find in Files
You can see the Find/replace in files option in the “Home” tab, close to the other search options. You can also get to find in files by pressing Ctrl + Shift + F. Find and replace in files are powerful search options that allow you to search for strings or text within multiple files contained in a directory.
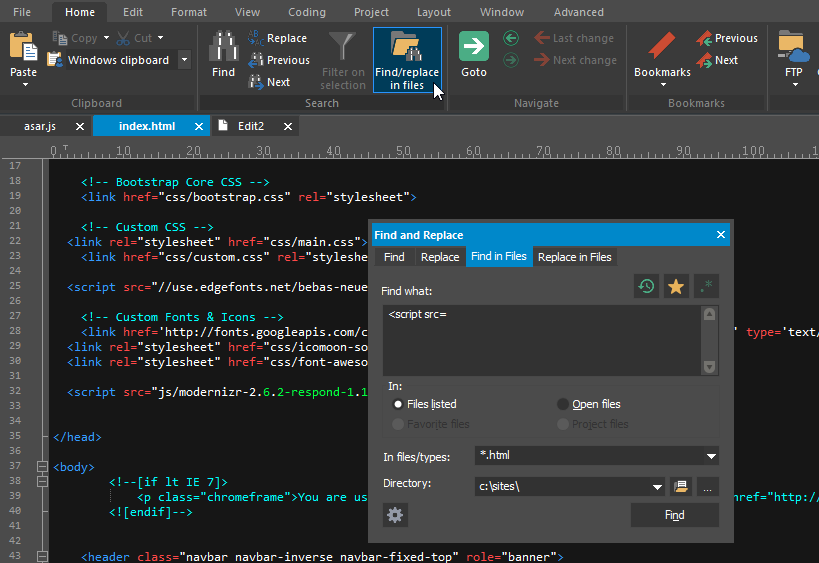
For our example, we would like to find all occurrences of an externally linked script in all of our HTML files, so we’ll set the find string to “<script src=”.
In:
Setting the “In Files/Types” to “*.html” tells UltraEdit to search only files with an extension of “.html”. If you would like to search in multiple file types, you can list multiple file types separated by semicolons; for example: “*.html; *.txt; *.php”.
In files/types
This setting allows you to choose where to search. To search in a directory, make sure “Files listed” is selected. The other options are self-explanatory for the most part. If any option is disabled, it’s because that option isn’t applicable. For example, if “Favorite files” is disabled, it’s because there are no favorite files defined.
Directory
You can click the … button to browse your system and select the folder you want to search. If you wish to include subdirectories beneath the folder you choose, make sure to select the “Search subdirectories” option in the advanced settings.
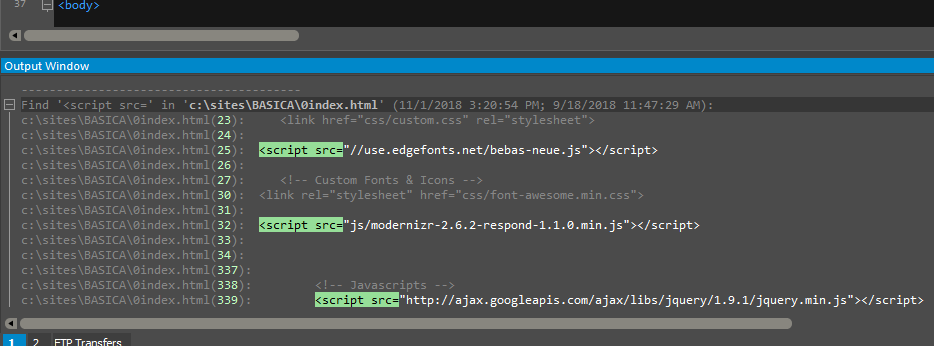
We’ll begin the search by clicking Find. On larger directories with many files, the search may take several minutes. You can always cancel a find or replace in files by clicking on its icon again in the ribbon while the search is running.
As you can see below, every occurrence found is listed in the output window with special highlighting, and each file where the search string was found is collapsible. This makes it very easy to visually browse results and matched files. You can double click a result to open the matched file to the line of the match.
You’ll see the following unique settings for find in files when you click the gear button.
Results to edit window
As noted above, by default UltraEdit will write results of find in files to the output window allowing you to scroll and double-click results to open the match. This option, however, instructs UltraEdit to write the results of the search to a new file instead of the output window. This allows you to edit, save, and print the results. If you want to open a result, you can do so by right-clicking it and selecting the “Open [file path]” option at the top of the context menu.
Match files / lines if string is not found
This is sometimes referred to as a “negative” search, where you only want to results that don’t match your search string. This works in the following way:
- Setting this to “Files” will return as results all files that do not include the search string.
- Setting this to “Lines” will return each individual line in results that do not include the search string, for all files searched.
The “Files” option only lists files that do not include the search string, but this option returns data on a line-by-line basis.
Search subdirectories
This instructs UltraEdit to search all subdirectories of the folder you specified above in the “Directory” field. By default UltraEdit will only search files within the top-level folder.
Ignore hidden subdirectories
If this option is selected, find in files won’t search any subdirectories that are set to “hidden” by the operating system.
Open matching files
Checking this option will automatically open all files containing a match. Use this option with care – if your search returns matches across hundreds of files, this will result in ALL of them being opened!
Subdirectories to ignore in search
You can exclude certain subdirectories by entering them here. For example, if you want to exclude any folder named “.git,” simply type “.git” into this field. Separate multiple items with a semicolon, for example, “.git;.svn;cvs”.
File names/extensions to ignore in search
You can exclude file types or names from the search by entering them here. For example, if you want to exclude from the search all files with an extension of “.bak”, simply type “*.bak” into this field. Or if you wish to exclude all files with names beginning with the string “index,” you could type “index*” here (the asterisk acts as a wildcard). Separate multiple items with a semicolon.
Use encoding
Check this box to manually specify an encoding type UltraEdit should assume when opening files to search them. If this option is left unchecked (recommended), the search will use the default operating system encoding for searching files unless a BOM is detected, in which case the encoding signaled by the BOM is used. This is an advanced option, and as such, we won’t cover all the possible options here. But you can see more information about this option in our find in files help documentation .
Replace in files
Replace in files is probably one of the most powerful – but most dangerous – search functions in UltraEdit. This allows you to edit massive amounts of files with just one click. The easiest way to access replace in files is to open the regular find dialog and click the “Replace in files” tab.
It is important for you to understand the replace in files command before you use it because all changes are permanent and cannot be “undone” or reverted, unless you have an external backup or copy of the affected files. We always suggest making a copy of your search folder and then doing the replace in files on the copy so that you can easily start over if your replace in files results in unintended changes.
In our example below, we are searching our C:\sites folder for the HTML open tag “<figure>”, and all matches will be replaced with “<figure class=”figure”>”. We have selected the option to “List changed files” because we want to see exactly where UltraEdit found a match and replaced it.
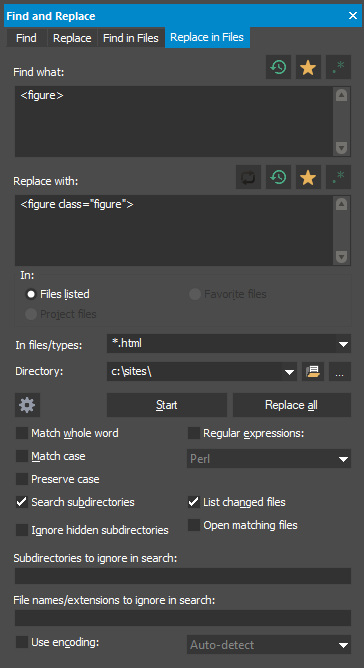
Once you’ve set these parameters to meet your specifications, you can click Start to initiate the replace in files. This will result in a prompt for each match in each file with several options on how to proceed.

If you want to run the replace in files without any prompts, click Replace all to run it all at once. As with find in files, depending on the amount of data, replace in files can take several minutes to complete, but you can cancel it by clicking Cancel replace in files in the “Home” tab.
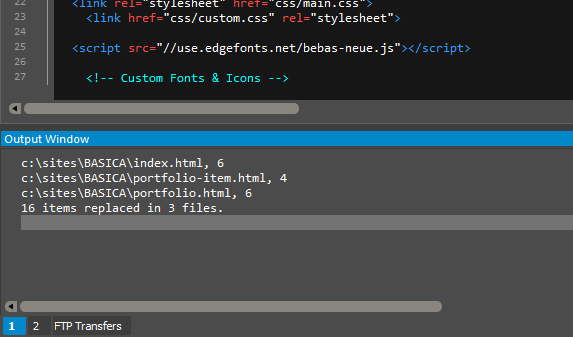
When the replace is complete the results summary is written to the output box. The summary tells you exactly where the replace occurred and how many times it occurred in each file.
According to our results summary (shown below), our string was replaced 16 times in three files: “index.html”, “portfolio-item.html”, and “portfolio.html”. The last line is an overall summary that tells us the string was replaced 16 times in 3 different files.
The additional options in the “Replace in Files” dialog (that were mentioned previously for find in files or replace) perform the same functions as described above for replace in files.

