IDM PowerTips
Increase Your System’s Virtual Memory for Large File Compares
What is virtual memory, and why is it important?
Virtual memory is basically space on your hard drive that is allocated by your operating system to be used as a supplemental reserve of memory when your an application’s RAM limit has been maxed out by that application.
For instance, if you compare two 50 MB files in UltraCompare, obviously this is a very memory-intensive process. Like most PC users, you’re ALSO concurrently running UltraEdit, a web browser, an email client, anti-virus, and other utilities…and the memory-intensive large file compare coupled with the RAM usage by these other utilities may exceed your system’s available RAM.
In this case, Windows will typically move some of the information stored in RAM over to your hard disk, where there is plenty of free space.
Once a certain internal threshold is reached, your operating system may direct any further memory usage of UltraCompare over to virtual memory so other applications running on your system are not affected by the large amount of memory required for the compare.
In such cases, it may be helpful to increase the size of virtual memory on your hard disk. We’ll walk through the steps for doing this below.

1. Access System settings
The first step to increasing your virtual memory is locating your system settings area. You can do this very easily by going to Start -> Run, typing sysdm.cpl and then pressing Enter.
Windows XP users should click the Advanced tab. Vista users should click on the Advanced System Settings link on the left, and then click the Advanced tab.
Next, under “Performance” click the Settings button. Finally, click the Advanced tab.

You’ll now see the “Virtual Memory” section at the bottom of this dialog. You should see a value following “Total paging file size for all drives” – this is the size in MB of your system’s virtual memory.
To increase your virtual memory, click the Change button.
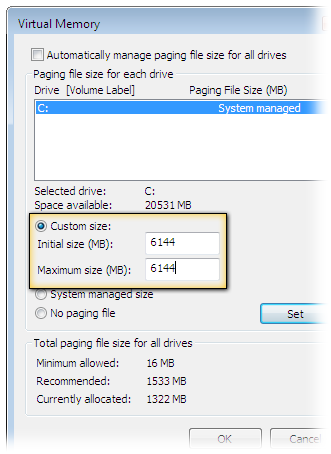
In the ensuing dialog are some options for changing your system’s virtual memory. You’ll want to make sure “Custom size” is selected – you can then set the initial (base) size of disk space that Windows will then set aside to be used solely for the purpose of virtual memory. You can change this to match the maximum size, or you can increase both beyond the maximum size.
Microsoft recommends that you set virtual memory to be no less than 1.5 times and no more than 3 times the amount of RAM on your computer. For power PC owners (like most UE/UC users), you likely have at least 2GB of RAM so your virtual memory can be set up to 6,144 MB (6 GB).


